Unit 07_ Modelling Process (Maya)
- seobin051013
- 4월 6일
- 4분 분량

최종 수정일: 4월 25일
Basic Figure Modelling Process

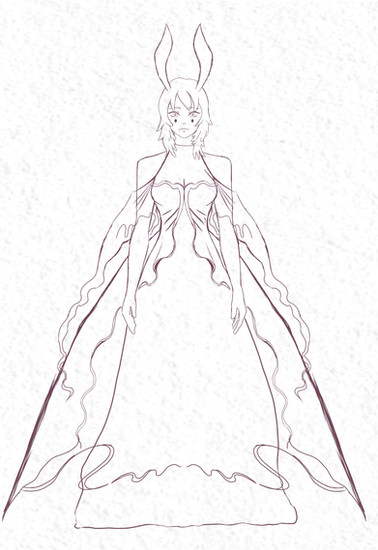


As the basic form of the creature I designed consists of the upper body of an adult woman combined with a snail’s body, I had to model the anime-style character physique—the creature’s most striking feature—to some extent. Furthermore, bearing in mind that I would be using ZBrush for the detailed rendering of elements such as the hands, fins, hair and the tentacles on the head, I decided to omit these from the Maya modelling process.

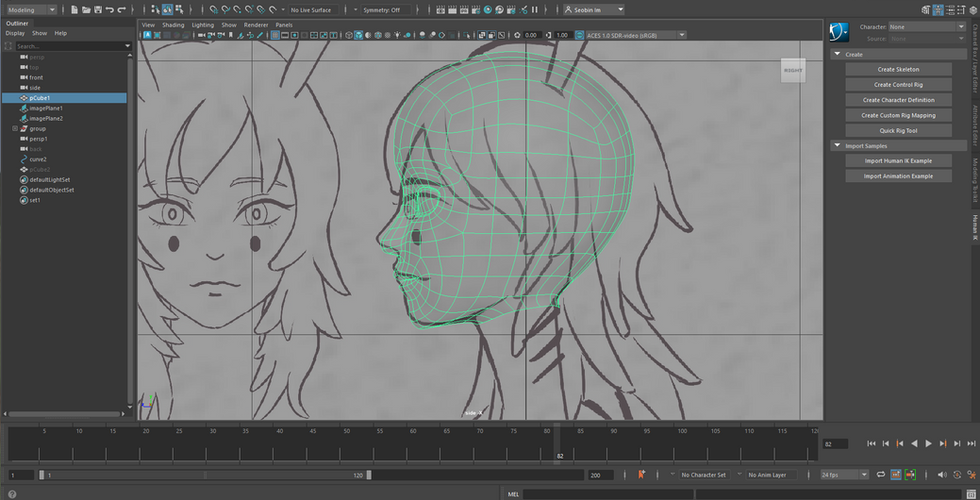


I began by modelling the character’s head, and during this process I had to make some adjustments to the design drawings I had created, which showed the creature from the front and the side. This was because the position and angle of the face from the front differed slightly from those of the nose and chin when viewed from the side. After making these adjustments, I realized once again how important it is to ensure that the front and side views align during the design phase—before modelling the character—to ensure a seamless and smooth modelling process.
As the human head is generally close to a spherical shape, I initially intended to start with a sphere. However, I began by subdividing a cube to create a slightly angular sphere, then gradually shaped the face to match the design. I then adjusted the position and angles of the eyes, nose, mouth and eyebrows to align with the front-view design. This relatively precise editing involved entering the Vertex panel in Edit Mode, where I created the basic shape of the eyes and the outline of the mouth, before shaping the chin and nose to match the side view sketch.


As mentioned earlier, whilst the upper body is that of an adult woman, the lower body is modeled on a nudibranch; consequently, the form is relatively simple, based on a gentle curve that tapers towards the rear. Taking into account that clothing will be added later, I decided to create a simple, basic shape.
As for the female breasts, since they are essentially teardrop-shaped, I was unsure how to create them from a square face, so I sought some assistance from the Tutor. By utilizing the ‘Circularize’ function at the top to transform the face into a circular shape, and then using the ‘Exclude Face’ function, I was able to create the basic form of the breasts.
Without shape wear, the breasts would naturally sag under the influence of gravity, so I paid particular attention to modelling the side profile. This consideration proved highly beneficial not only for the illustration but also for the modelling work itself, requiring a deeper level of anatomical knowledge regarding the human form. Furthermore, the lines where the neck, shoulders and arms connect are characterized by gentler curves in the female form compared to the male. Although I initially intended to model the figure with both arms pressed close to the body, as depicted in the design, I ultimately modeled it with the arms slightly apart to facilitate the ZBrush and rigging processes.
Detailed Modelling Process

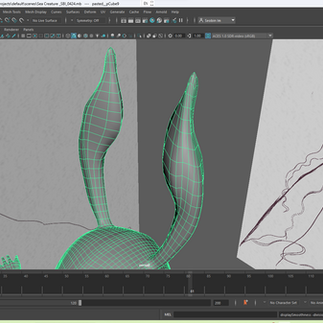


Due to the nature of the creature’s design—where its auditory organs take the form of rabbit-like ears situated on top of its head rather than human ears—I did not model ears alongside the jaw; instead, I created the creature’s ears on top of its head, following the jawline.
Although the creature’s long, rabbit-like ears were positioned on top of the head, they were created relatively late in the process (when the model had accumulated a large number of polygons).
Consequently, I selected two separate faces on the head, and in Face mode, utilized the Circulize and Extrude Face functions, followed by the Insert Edge function in Edge mode, to shape the ears. At this stage, by alternating between shortcut keys 1 and 3, I was able to refine the shape whilst checking the final appearance of the curves before applying the Smooth function (equivalent to Blender’s Subdivide Surface function). Furthermore, by utilizing these functions, I was able to create the pouch at the bottom.

One of the most delicate and complex parts of the human body is the hand. The wrist and hand contain 29 bones, over 25 joints and more than 30 muscles, making it the most complex part to model. To make it look like a human hand, I had to create it whilst accurately knowing the position and angle of the thumb. Referring to the tutorial at the link provided, I began with a tube shape, first establishing the positions and angles of the fingers (excluding the thumb). I then used the ‘Face Extrude’ function to create the fingers. In Edge mode, I added the positions of the joints and the thickness of the knuckles where the fingers and joints meet, using the ‘Insert Edge’ and ‘Bevel Edge’ functions, thereby establishing the basic framework of the hand.
In the case of hair that is round and tapers towards the ends, such as the auditory organs and the venom sac, the modelling approach differed from that used for typical animated hair; I created the hair using the method demonstrated in the YouTube tutorial mentioned above. By dividing a cube vertically into three equal parts and reducing the width at both ends, I was able to create the creature’s distinctive hair by adjusting its curvature and angles in the ‘Smooth’ preview mode (accessible via shortcut key 3).

In addition, for the creature’s eyelashes, eyebrows and pupils, I used the Curve tool to create the curve of the eyelashes based on the design, then converted this into a Sweep Mesh to transform it from a flat object into a three-dimensional shape. As for the eyebrows and pupils, I created them using the Extrude Face command in Face Edit mode and the Circulise Edge command in Edge Edit mode.
To create a final form with perfect symmetry, I removed half of the object along the Y-axis and used the ‘Duplicate Special’ (Ctrl + Shift + D) function to copy a symmetrical object, which I then further modified (shape of the corners of the mouth, height and width of the nose). Finally, I merged the two objects into a single object using the ‘Combine’ function at the top. As this involved merging two distinct objects into one, overlapping vertices were created at the centre. As this could pose a hindrance during ZBrush and UV mapping work, I used the ‘Merge Vertices’ function in Vertex Edit mode—by holding down the right mouse button—to fully connect the two objects that had been combined into a single entity.


댓글