Unit 07_ Look Development and Re-topology (Zbrush + Maya)
- seobin051013
- 4월 6일
- 6분 분량

최종 수정일: 5월 1일
The Basic Setting for Zbrush
In the case of ZBrush, as the default settings and screen controls differ from those in Blender or Maya, learning these was both my first step and an essential part of the process for me as a complete beginner. Working from home, I watched tutorial videos and taught myself how to configure the basic settings to improve my workflow efficiency, as well as the keyboard shortcuts that make it easier to edit objects from various angles.

First of all, in order to use a wider screen, go to ‘Document’ in the top-left corner and click ‘Double’ in the list to enlarge the screen. This is extremely helpful as it provides a wider field of view, allowing you to edit objects whilst viewing them from multiple angles.


Then, in the ‘ Mem ’ section of the ‘ Preference ’ menu located at the top centre, maximise the values for the three options—‘ Doc Undo ’, ‘ Tool Undo ’ and ‘ Max Poly Per Mesh ’—to increase the maximum capacity of the undo function. This makes it much easier to modify objects using the undo function whilst working.
Furthermore, if you click ‘ Store config ’ under ‘ Config ’ in the ‘ Preference ’ menu, you can save these changes so that they are applied when editing other files or objects. This function can also be accessed using the shortcut ‘ Ctrl + Shift + 1 ’ .
The First Step for Workflow of Zbrush

And this is the most important step: to edit an object file created in Maya so that it is compatible with ZBrush, you must first ‘ Export ’ the file from Maya and save it as an ‘ obj file ’, then open this file in ZBrush. To do this, click ‘ Import ’ in the ‘ Tool ’ menu at the top and drag the saved file to load it.
Note that this may load not only the desired object but also other unnecessary objects, so once the required object appears on the screen, you must immediately press the shortcut key ‘T’ (the shortcut for Edit Mode).

In order to edit objects modeled in Maya smoothly, I had to familiarize myself with the shortcut keys for adjusting the view port. However, due to the nature of ZBrush, a pen tablet or graphics tablet is required; moreover, as I am left-handed, using the Shift and Alt keys on the left side of the keyboard alongside the tablet pen and mouse simultaneously put me at a relative disadvantage compared to right-handed users.
Consequently, I adopted a method of editing objects in ZBrush that involved making maximum use of the ' Frame ', ' Move ' , ' Zoom3D ' and Rotate controls in the editing window at the bottom right, whilst reserving the keyboard shortcuts for more precise screen adjustments.
To create detailed models in ZBrush, you must select 'Make Poly Mesh 3D' from the Tools list on the right to enable sculpting. Next, click 'Divide' under 'Geometry' (the second item in the right-hand tool list) to increase the object's polygon count and create a better sculpting environment. The shortcut Ctrl + D creates a new divide level; each new level doubles the polygon count. Conversely, the shortcut Shift + D reduces the polygon level.
Using the various kinds of Brushes
ZBrush ' s basic brushes are categorized by their relief and recessed characteristics. In the case of Clay, as the name suggests, it creates a texture that resembles applied clay; it has the property of covering the surface regardless of the existing object's details, which contrasts with the Standard brush.
There were several brushes that were used most frequently while editing this creature: Clay Build Up, Flatten, Smooth, and Move.
First, the Clay Build Up brush is flat and sharp, making it ideal for creating detailed muscles on the arms and back. To smooth out uneven surfaces or naturally round off sharp edges created by the Clay Build Up brush, I used the Flatten and Smooth brushes. The Smooth brush is one of the most commonly used brushes among Zbrush users, and it can be used while holding down the Shift key. As for the Move brush, it allows you to naturally move the selected surface within the brush’s range without adding details to the existing object’s surface; when using the Alt key, you can move the selected polygon face while keeping its orientation fixed.
Among the elements of the creature created in Maya, the most unnatural parts were the hands and arms, the chest and armpits, and the back (specifically the shoulder area connected to the back). I was able to refine and render the details of the prominent shoulder blades, finger joints, and elbows using the brushes mentioned earlier. Additionally, since the creature was created in Maya using “Duplicate Special” to achieve bilateral symmetry, the boundary line running down the center made the creature’s appearance look unnatural and awkward overall. Therefore, I was able to naturally eliminate this boundary using the Flatten brush and the Smooth function. The brush size and intensity could be adjusted using the shortcut keys S (to adjust brush size) and O (to adjust brush detail).
Optimization in Zbrush
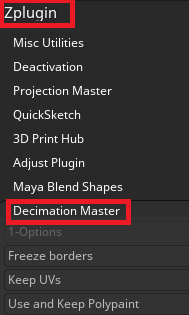
Since objects that have undergone all sculpting and detailing work in ZBrush are in high-poly form, select 'Decimation Master' from the ZPlugin list at the top to convert them to the OBJ file format, taking into account the possibility of program errors.
Before doing so, I had to verify three things: whether it is acceptable for the Divide value to be lost, whether the UVs and PolyPaint might be corrupted (so I should check the relevant options), and that the mesh shape will change from a stable quadrilateral to a triangular mesh.

1 - Options
Freeze borders: Preserves the object's outlines
Keep UVs: Preserves the object's UV information
Use and Keep Polypaint: Preserves the polypaint
2- Pre-process
pre-process current / pre-process all:
This is a mandatory step before using the decimation feature, and the more polygons there are, the longer it takes. “Current” calculates only the items selected in the Subtool, while “All” calculates all of the Subtool.
3- Decimate
% of decimation:
Indicates the percentage of polygons to be reduced. The lower the percentage, the fewer the polygons.
k polys / k points:
These values change based on the percentage setting. You can use them to estimate how much the number of polygons and points will change.
Decimate Current / Decimate All:
Reduces the number of polygons. “Current” applies to only the selected subtool, while “All” applies to all subtools.
Re-topology Workflow in 3D Maya
Re-topology is an essential process that reduces the number of unnecessary polygons, thereby saving time during UV mapping and rendering. To review efficient re-topology techniques, I referred to this YouTube tutorial video.

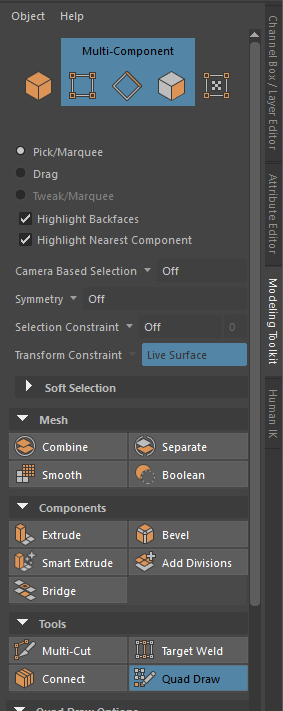
First, to create a new low-poly object on top of an existing object with a high-polygon count, I selected the object imported into ZBrush, clicked the magnet-shaped panel at the top to set the existing object to “Live” mode, and then enabled the “Quad Draw” function in the Modeling Toolkit menu on the right. With this feature active, it is available to draw green dots on the object’s surface.

After creating four dots, press Shift to generate a rectangular face. While I can increase the number of faces this way, I could also select a single edge, press the Tab key, and drag to create a face.
Additionally, when creating a large number of faces, an efficient method is to hold down the Tab key and click the middle mouse button to create multiple faces at once. You can also split a single face into multiple faces by holding down the Ctrl key, similar to the Insert Edge function.
While adding faces in this method, the increased faces may become uneven in size or distorted. In such cases, press the B key to activate Soft Selection, then hold down the Shift key and drag to use the Relax function, which will evenly snap the faces to the surface of the existing object.

For relatively complex shapes, such as a creature’s face or hair, while optimization is possible using the method mentioned earlier, my tutor recommended a more convenient and faster approach.
First, separate the head from the body, then use “Delete History” and “Clean Mesh,” and finally reduce the number of polygons by selecting “Unsmooth” from the “Mesh” menu at the top. Of course, with this method as well, you must check the detailed settings of the Remove function to reduce the number of polygons to the desired extent, and you can estimate the number of polygons that will be reduced based on the Percentage value.
Furthermore, just as with the re-topology method described earlier, since objects composed of rectangular meshes are more convenient for subsequent UV mapping, you can optimize the polygons using the Quadrangulate function to ensure they consist solely of rectangular faces.


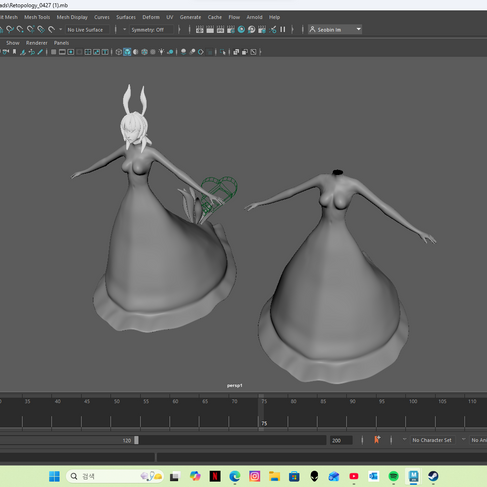
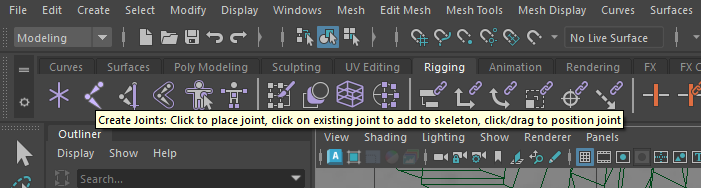
Additionally, during the re-topology process, the venom sacs attached to the creature’s lower body were separated from the torso. This was done because, in order to create the effect of the venom sacs swaying whenever the creature moves during the rigging process, it was more efficient to add joints while each venom sac was separated from the torso.
After completing the re-topology process, I proceeded to create clothing that would highlight the creature’s silhouette. Since the design was crafted to follow the unique body lines of the creature, I duplicated the re-topologized torso (Shift + D) and modeled it according to the design blueprint.


댓글